10 Common Laminate Flooring Mistakes (and How To Prevent Them)
Want your laminate floor to look great and last for years? Then it’s vital to avoid the most common laminate flooring mistakes. Whether you’re learning how to lay laminate flooring for the first time or need a refresher, this guide will help you get it right.
Taking shortcuts can lead to big problems, such as buckling boards, gaps, creaking, or damage. If you’re doing the job for a customer, you’ll have to start again, at a huge cost to yourself, or risk poor reviews. If it’s your own home, it means frustration and extra cost.
This guide will explain the 10 most common laminate mistakes to help you start every job with confidence.
Read our full guide to laying laminate flooring

1. Installing Straight from the Box
The Mistake
If you open the packs and start fitting boards straight away, you’re asking for trouble. Laminate expands when it’s warm and contracts when it’s cold, as well as with any humidity. If it hasn’t had time to adjust to the room, the boards may swell or shrink after fitting. That can cause the floor to buckle and lift, or lead to gaps opening later on.
Prevent Warping
Open the boxes and spread the boards out in the room where they’ll be fitted. Leave them for at least 48 hours. This gives the laminate time to get used to the environment. It’s called acclimation, and it helps avoid warping later on.
You can usually work around the boards to an extent, checking the subfloor and measuring up.
2. Uneven or Unprepared Subfloor
The Mistake
Laying laminate on a bumpy or damp subfloor causes serious problems. Uneven floors can mean the boards move when walked on, creaking or even cracking the joints.
You also need to check the subfloor moisture levels, particularly when laying on concrete or screed. Any moisture in the subfloor can damage the underside of the boards, causing swelling or delamination, which means the layers of the boards separate.
Prepare Subfloors Properly
Start by checking moisture levels using a moisture meter. You’re aiming for around 30% relative humidity. If the floor is too damp, you’ll need to dry it out before fitting. Next, check for high or low spots. Use a concrete grinder for raised areas or a floor sander if it’s a larger area. A level surface gives the floor stability and stops future issues.
3. Skipping the Underlay
The Mistake
Some people try to save time or money by fitting laminate without an underlay. Big mistake. Laminate is a floating floor – it doesn’t get fixed down. That means it needs something underneath to absorb small movements and protect against moisture. No underlay = noisy, unstable, and damp-prone flooring.
H3: The Fix
Use a proper underlay matched to your subfloor (concrete or timber). Underlay cushions the floor, stops noise, and blocks moisture. It also helps with insulation, making the floor warmer and more comfortable to walk on.
4. Incorrect Expansion Gaps
The Mistake
Laminate needs room to expand and contract when the temperature changes. If you install it right up to the wall or skirting, the boards will push against each other as they expand. This causes buckling, lifting, or damage to the locking joints.
The Fix
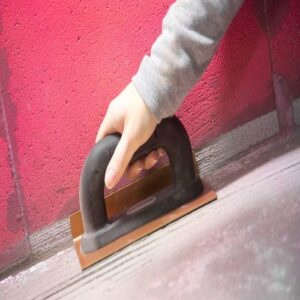
Leave an expansion gap of 10–12mm around the entire perimeter. That includes under door frames, around radiator pipes, and near any fixed objects. Use spacers during installation to keep the gap consistent. You’ll cover the gaps later with skirting or beading.
5. Poor Board Alignment
The Mistake
If your first row isn’t straight, the rest of the floor won’t be either. Over time, even small misalignments build up, leading to gaps and boards that don’t click together properly.
The Fix
Mark a straight starting line using a chalk line or laser level. Measure from the wall, allowing for expansion gaps. Lay your first row carefully, and check it stays square as you go. It’s much easier to fix mistakes early than after five rows are down.
6. Not Staggering Joints Properly
The Mistake
Lining up all the short board ends in a row makes the floor weak and unstable. It also looks unnatural and draws the eye to the joints.
The Fix
Always stagger joints by at least 30cm (or one-third of the board length). This helps lock the floor together more securely and gives a better-looking finish. Plan your cuts so you don’t end up with tiny pieces at the start or end of a row.
7. Damaging Plank Edges During Installation
The Mistake
Hitting the boards with a hammer or fitting tool without protection can crush the edges and ruin the click-lock mechanism. Once that’s damaged, the boards won’t hold together properly, and you’ll have wasted them.
The Fix
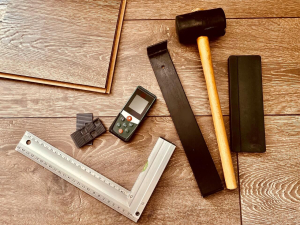
Use a tapping block and a pull bar to protect the board edges and give you enough force to click joints in without damage. Be gentle and controlled – don’t bash it in frustration.
8. Cutting Boards Inaccurately
The Mistake
Messy cuts lead to gaps, waste, or boards that don’t fit snugly. It can also cause splintering or chipped edges that ruin the final finish.
The Fix
Measure carefully. Double-check before you cut. Use a laminate cutter or a jigsaw with a fine-toothed blade for smooth, accurate cuts. A square edge or scribing tool can help mark tricky shapes or corners.

9. Not Checking for Door Clearance
The Mistake
After installing the new floor, you might find your door no longer opens or closes properly. That’s a frustrating problem that’s easy to avoid.
The Fix
Before fitting, check the gap between the door and subfloor. If your new floor + underlay is too thick, you’ll need to trim the bottom of the door. Use a door jamb saw for a clean, straight cut that fits neatly over the new surface.
10. Rushing the Final Row
The Mistake
You’ve nearly finished. It’s tempting to slap in the last few boards and be done – but this is where many people go wrong. A bad fit on the last row leaves gaps or loose edges that catch your foot or look messy.
The Fix
Take your time. Measure the space accurately. You may need to trim boards lengthwise or scribe them to fit the shape of the wall. Use a pull bar to get them snug. A neat finish here makes all the difference.
Lay Laminate Tiles Right First Time
Learning how to install laminate flooring properly means avoiding common errors. With the right tools, a steady hand, and good prep, you’ll get a floor that looks fantastic and lasts years.
Need professional tools?
We have everything you need to avoid mistakes and do a clean, pro-level job.


