

The 2025 Laminate Installer’s Toolkit: Everything You Need to Get Started
Build Your Laminate Floor Tool Kit
The tools needed for installing laminate flooring are straightforward, so make sure you’re equipped before you get started.
The Basics
- Measuring Tape: get your laminate boards the right length for the room
- Pencil: don’t eye it – mark your measurements before you start cutting. These flat carpenters’ pencils don’t roll away from you while you’re working either.
- Hammer or Rubber Mallet: tap the boards together effectively
- Hacksaw: cut boards to the correct length. You’ll occasionally need to cut round shapes to fit around radiator pipes, so a jigsaw is recommended. A hacksaw is useful for straight cuts when you don’t have a power supply, but as jigsaws are relatively inexpensive, the time saved is well worth it.
- Protractor: measure the room corners to make sure you cut at the right angle
- Utility Knife: to open packaging or score boards, a standard utility knife is useful to have on hand.
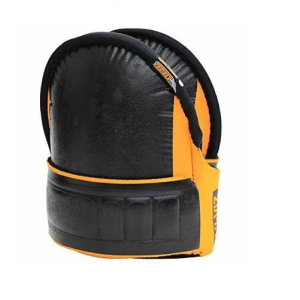
- Gloves and Kneepads: to protect your hands and knees and avoid downtime later on.
Specialised Tools
You will only use these tools for laminate flooring and LVT, as they don’t have a purpose with other flooring types. Make sure you have them in your toolkit so you can accept laminate jobs when they come up.
Spacers
Laminate Spacers are little plastic clips that maintain a set distance between the walls and your laminate floorboards. They keep everything steady while you work and make sure you leave room for the boards to expand.
Tapping Block
A plastic tapping block protects the boards from direct impact from your mallet. Place this block at the short end of each board and hit it to click the board into place. This prevents cracking the tongue-in-groove mechanism or the board surface itself.
Pull Bar
Reverse the force of a hammer impact to help lock end pieces in place. This is useful when you’re at the end of a complete row and can’t fit the hammer between the wall and the board. Pull bars have tapping blocks attached to a flat claw that hooks onto the end of the board.
Laminate Tools to Speed Up the Work
Tools for fitting laminate flooring should help you, not hinder you. You can finish quickly without rushing with some simple cutting tools. They’re an investment, and if you’re doing more than a one-off DIY project, they’ll save you hours.
- Manual Laminate Tile Cutter: Like a paper guillotine, this tool cuts laminate boards quickly with a downward force. No clamp, dust or noise necessary, and a straight line every time.
- Door Jamb Saw: designed to undercut door casings to fit laminate underneath, these have a strong rotatory blade and a small profile to work in tight spaces.
Subfloor & Underlay Prep Tools
We’ve said before, and we’ll say it again, getting the subfloor right is more than half the battle. Making sure you have the right tools for subfloor prep will save a lot of time.
Long Spirit Level
You need a long spirit level to check that the floor is flat across the whole room. A short level might miss dips or humps. Creating a flat base means your boards won’t rock or bounce once fitted. You could also use a laser-guided level to speed up measurements.
Floor Scraper
Use a floor scraper tool to remove old glue, lumps, or debris from the subfloor. If you don’t clear it properly, those bumps will show through the new floor and may cause uneven wear or clicks that don’t hold tight.
Moisture Meter
A moisture meter helps you check if the floor’s too damp to lay on. Laminate hates moisture – if you fit over a wet subfloor, the boards will swell or lift. Always test before laying.
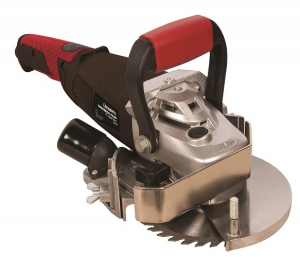
Concrete Grinder
To remove small bumps and raises in a subfloor, a handheld concrete grinder will be faster than a sanding trowel. For larger floors that need levelling, an orbital sander can be adapted to grind concrete with specialist blades.
Screeding Tools
If a concrete subfloor has cracks or depressions, you need to apply self-levelling screed to create a new layer. Tools for screeding include:
- A mixing bucket and drill
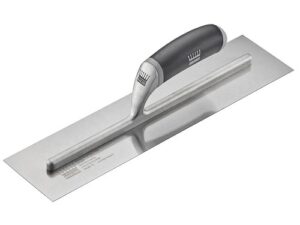
- Screeding trowels to spread the screed evenly
- And spiked shoes to avoid stepping on the screed.
Underlay Knife
Any sharp utility knife can cut underlay to shape without tearing it. A clean edge means the underlay fits better and doesn’t bunch up under the laminate.
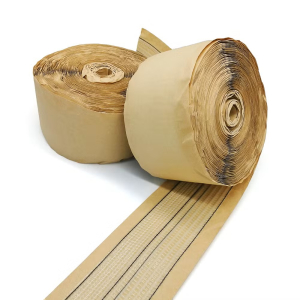
Flooring Tape
Use double-sided flooring tape to join sections of underlay and seal edges. This keeps the underlay in place while you work and stops moisture creeping up through the joins.
Invest in Quality Tools
The better your tools, the longer they’ll last, and it’s a fact that paying once for something high quality saves money in the long run. Cheap tools can break mid-job, slow you down, or leave a poor finish – and that’s the last thing you want when you’re aiming for a professional result. Whether you’re just starting out or have years on the job, the right tools make every job quicker, cleaner, and easier.
Browse our full range of laminate flooring tools here – built for fitters who take pride in their work.